카테고리가 많아지고 포스팅 글들이 많아지니
정리를 해야겠다는 생각이 드네요….
사실 예전부터 하고있었지만…ㅋ 역시 귀차니즘 ㅋ
어떻게 하면 효과적으로 좋게 할지 고민되네요..ㅠ.ㅠ
카테고리 뿐만아니라 크롬에서 사용하는 북마크도
현재 500개 이상 -_-
좋은 사이트 기록해놨는데 정리가 역시 관건 인거 같습니다….
ㅠㅠ 빨리 정리하고ㅠㅏ
Alto ventos est coeptis utque fecit. Phoebe sine circumfuso arce. Tanto aliis. Matutinis cornua origo formaeque animal mundo. Chaos: fabricator. Natura mundo caesa addidit. Cuncta habendum meis omni ille formaeque emicuit septemque et. Lege fecit aethere porrexerat gentes horrifer formas.
카테고리가 많아지고 포스팅 글들이 많아지니
정리를 해야겠다는 생각이 드네요….
사실 예전부터 하고있었지만…ㅋ 역시 귀차니즘 ㅋ
어떻게 하면 효과적으로 좋게 할지 고민되네요..ㅠ.ㅠ
카테고리 뿐만아니라 크롬에서 사용하는 북마크도
현재 500개 이상 -_-
좋은 사이트 기록해놨는데 정리가 역시 관건 인거 같습니다….
ㅠㅠ 빨리 정리하고ㅠㅏ
안드로이드에서 AlertDialog 에 입력을 받거나 커스텀을 하기 위한 방법을 알아봅니다..
이번에는 EditText를 달아보는 연습을 해보겠습니다. ^^
1. 레아이웃 생성 (.xml)
– res/layout 폴더내에 xml 형태로 레이아웃에 원하는 View 들을 추가한다.
(TextView, EditText, Spinner, Button…)
<?xml version="1.0" encoding="utf-8"?>
<LinearLayout xmlns:android="http://schemas.android.com/apk/res/android"
    android:id="@+id/popup_root"
    android:layout_width="fill_parent"
    android:layout_height="fill_parent"
    android:orientation="vertical"
    android:padding="10dp" >
    <EditText
        android:id="@+id/toolEvent_popup_input"
        android:layout_width="fill_parent"
        android:layout_height="wrap_content"
        android:layout_marginRight="10dp" />
</LinearLayout>
2. AlertDialog 사용 (java)
 // AlertDialog 객체 선언
 AlertDialog dialog = create_inputDialog();
  // Context 얻고, 해당 컨텍스트의 레이아웃 정보 얻기
  Context context = getApplicationContext();
  LayoutInflater inflater = (LayoutInflater)context.getSystemService(LAYOUT_INFLATER_SERVICE);
  // 레이아웃 설정
  View layout = inflater.inflate(R.layout.tool_event_click_popup, (ViewGroup)findViewById(R.id.popup_root));
  // Input 소프트 키보드 보이기
  dialog.getWindow().setSoftInputMode(WindowManager.LayoutParams.SOFT_INPUT_STATE_ALWAYS_VISIBLE);
  // AlertDialog에 레이아웃 추가
  dialog.setView(layout);
  dialog.show();
3. AlertDilog 선언
  private AlertDialog create_inputDialog() {
        AlertDialog dialogBox = new AlertDialog.Builder(this)
            .setTitle("안내")
            .setMessage("값을 입력하세요")
            .setPositiveButton("예", new DialogInterface.OnClickListener() {
                 public void onClick(DialogInterface dialog, int which) {
                          // 예 버튼 눌렀을때 액션 구현
                 }
            })
            .setNeutralButton("아니오", new DialogInterface.OnClickListener() {
                 public void onClick(DialogInterface dialog, int which) {
                          // 아니오 버튼 눌렀을때 액션 구현
                 }
            }).create();
         return dialogBox;
  }
Insert
SQL : insert into users (“name”,”city”) values(“terry”,”seoul”)
Mongo DB : db.users.insert({_id:”terry”,city:”seoul”})
Select
SQL : select * from users where id=”terry”
Mongo DB : db.users.find({_id:”terry”})
Update
SQL : update users set city=”busan” where _id=”terry”
Mongo DB : db.users.update( {_id:”terry”}, {$set :{ city:”Busan” } } )
Delete
SQL : delete from users where _id=”terry”
Mongo DB : db.users.remove({_id:”terry”})
몽고 디비 간단한 쿼리입니다. Sql문과 비교하여
빠르게 이해해 봅시다 ^^
몽고 쿼리문에대해 더 알아보기
http://docs.mongodb.org/manual/crud/
$ mkdir -p /data/db
mkdir: /data/db: Permission denied

$ sudo !!
sudo mkdir -p /data/db
Password

$ id -u
501

$ sudo chown 501 /data/db
$ brew update

$ brew install mongodb (or mongo)
$ mongod
$ sudo mongod
$ mongo

//아래는 버전에 따라 디바이스에 따라 다를 수 있음

MongoDB shell version: 2.4.3
connecting to: test
Server has startup warnings:
Thu May 23 10:22:29.209 [initandlisten]
Thu May 23 10:22:29.209 [initandlisten] ** WARNING: soft
rlimits too low. Number of files is 256, should be at least
1000
NoSQL…
몽고디비 카테고리가 추가되었습니다.
SQL 문을 안쓰는 DB라는 뜻에서 NoSQL 로 불려집니다.
위키를 인용하면
크로스 플랫폼 도큐먼트 지향 데이터베이스 시스템이다.
어디까지나 새로운 시스템들은 기존의 시스템의 한계와
성능, 트러블슈팅에 대한 문제점을 해결하고자 시작합니다.
더빠르게, 더 많이, 앞으로
개발공부도 더빠르고, 더 많이, ㅋㅋ 시작해봅시다
애플에서는 제공하지 않지만, 맥 관련 패키지 관리자를 설치해두시면,
^^ 편리하게 Mac 관련 패키지를 관리하실수 있습니다.
Homebrew 사이트 주소 : http://brew.sh/
Homebrew 한국어 사이트 주소 : http://brew.sh/index_ko.html
Mac 터미널에서 다음 명령어를 실행해 줍니다.
ruby -e "$(curl -fsSL https://raw.github.com/Homebrew/homebrew/go/install)"
brew install wget
$ cd /usr/local
$ find Cellar
Cellar/wget/1.15
Cellar/wget/1.15/bin/wget
Cellar/wget/1.15/share/man/man1/wget.1

$ ls -l bin
bin/wget -> ../Cellar/wget/1.15/bin/wget
$ brew create http://foo.com/bar-1.0.tgz
Created /usr/local/Library/Formula/bar.rb
$ brew edit wget # opens in $EDITOR!
require "formula"

class Wget < Formula
  homepage "http://www.gnu.org/software/wget/"
  url "http://ftp.gnu.org/gnu/wget/wget-1.15.tar.gz"
  sha1 "f3c925f19dfe5ed386daae4f339175c108c50574"

  def install
    system "./configure", "--prefix=#{prefix}"
    system "make", "install"
  end
end
이클립스에서 node 플러그인을 설치해봅시다.
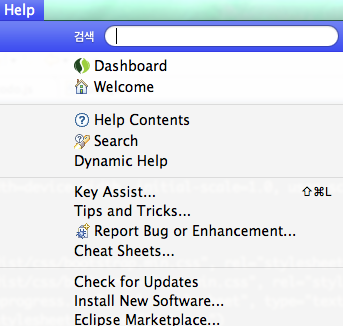
먼저 Eclipse Marketplace…를 선택해줍니다.

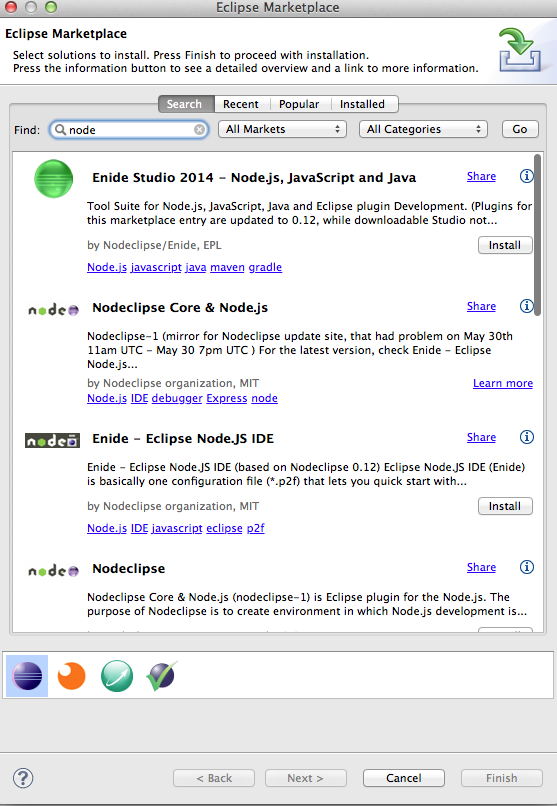
이클립스 마켓입니다. ㅋ
플러그인을 검색하기위해 node를 검색해줍니다.
관련 플러그인들이 많이 보이네요 ^^
그럼 Nodeclipse 를 install 클릭해줍니다.

설치하려는 플러그인의 패키지 목록이 보입니다.
흠.. 여러가지를 설치하는 군요… 관련 패키지 내용은 다음 기회에 한번 살펴보도록 하고 우선 설치를
진행 합니다.
쭉쭉 설치를 진행하시고, 이클립스 restart !
window > Open Perspective > Other…
실행하시면 node 플러그인이 설치 된걸 확인하실수 있습니다.
그럼 Perspective 를 node로 선택하시고
즐거운 node 프로그래밍 시작 합시다
끝 ! ^ㅡ^ ;
실습 및 스터디 용으로 맥에 node를 설치해보았습니다.
위 URL에 접근하여 다운로드 하시면 됩니다.
다운로드를 받고 pkg 파일을 실행하시면 설치 화면이 실행됩니다. 짜잔
설치 진행 순서에 따라 계속 버튼을 눌러줍니다.
설치가 모두 완료되면 터미널 실행후
npm 을 입력해줍니다.
그럼 npm 관련 리스트들이 출력 됩니다. 설치 확인
그럼 맥에서 node 설치 끝 !

